I have been dying to make these for a few weeks now, and finally got around to it! I served them with a pork cutlet and some mashed potatoes, but will definitely be re-purposing them for a dessert treat and another dinner here on the blog! They were beyond easy to make, and were the only part of dinner that did not make it into the leftovers bowl!
Deep Fried Apple Rings
Yields 4 servings
Ingredients
3 Gala apples, cleaned and peeled
1 cup complete pancake mix
3/4 cup warm water
1 tsp cinnamon
1/2 tsp all spice
1/4 tsp ground cloves
Oil for deep frying
To Prepare the Apple Rings
1. Cut your apples into rounds, straight through the stem and core, which we will remove in the next step!
2. Once you have cut all three apples into rounds, cut the cores out. I found it was easiest to do this by taking a 1 inch round cookie cutter and putting it through the core area. It only took a minute to get through all of them!
3. Start heating your oil over high heat.
4. Mix the pancake batter, water, and spices together.
5. Dip a few apple rings in the batter until well coated, pick them up with a fork through the middle, let the excess batter drop off, and put in the oil.
6. Brown on one side and then flip and cook until brown on the other.
7. Pull them out of the oil once browned on both sides and place in a bowl or on a plate.
8. Repeat steps 5 through 7 until all of your apples are cooked.
9. I sprinkled with a little more cinnamon before serving!
Showing posts with label Fried. Show all posts
Monday, August 22, 2011
Monday, August 15, 2011
Zucchini and Eggplant Fries
My uncle has been gardening like crazy this year, which has essentially created a bumper crop situation in his backyard! Every time we see him, we leave his house with a plethora of heirloom tomatoes, zucchini, eggplant, and an assortment of hot peppers! Being that my dad and I are the only ones in the house that eat any of these items, it has been a little difficult to go through it all. The other night I bit the bullet, bought my sister a bag of chips, and made these fries to go along side our turkey burgers! I will tell you that my mandolin slicer's french fry cutter was a huge help in making these, but is not a necessary piece of equipment to make these. You can cut the veggies into steak fries or strips very easily with a knife!
Zucchini and Eggplant Fries
Yields 5 - 6 servings
Ingredients
1 medium eggplant, cleaned, peeled, and cut into fries
1 medium zucchini, cleaned, peeled, and cut into fries
2 cups of oil, on high heat
4 eggs, beaten
2 cups bread crumbs
Dipping sauce of your choice, I opted for Woeber's Sweet Pepper Sauce
To Prepare the Fries
1. After the veggies are cut, begin heating your oil over high heat. \
2. Dredge a small batch of the veggies through the eggs, and then the bread crumbs.
3. Cook them in the oil until they are golden brown and crisp.
4. Repeat these steps until you have cooked all of the fries.
5. Serve along side a sauce of your choice and enjoy!
Saturday, September 11, 2010
Captain Crunch Chicken and Sweet Corn on the Cob
You are probably thinking, "Ewwwwe!" This is actually something my mom and I had discovered at Planet Hollywood in Atlantic City. (On a side note, do those even exist anymore?!) It was one of her favorites, but we rarely got the chance to go, so we adapted it so we could make it at home. I've been missing her a lot lately, and had this on the brain and had to make it. Now, while some people think I am a bionic cooking machine, I am in fact human, and managed to screw up my breading process. I forgot that when I make this, the majority of the wet breading process is egg, and not milk! So, if you follow the directions below, your chicken will come out with much more breading and will look more appealing than the photos of my chicken are! I usually serve this along side of corn and something else healthy since I fry the chicken, in hopes of balancing out the calories, so today I opted for corn and watermelon!
Captain Crunch Chicken
Yields 3 servings (2-3 pieces of chicken per person)
To Make the Breading
1. Put 3 cups of Captain Crunch between two pieces of parchment paper or onto a cookie sheet.
2. Crush them using a rolling pin or something heavy until they are a mix of smaller and very tiny pieces. If you don't want to go this route, you can put them in a blender, food processor, or magic bullet! By doing it by hand you will get varying sizes of breading that will give your chicken more texture, where as running it through a processor will give it a very even texture!
3. In a separate bowl, mix 3 eggs with 3 tablespoons of milk.
To Prepare the Chicken
1. You will need to heat an oil of your choosing in a pan. Make sure there is enough oil in the pan to cover at least half the height of chicken when it is lying in the pan! Most of you will cringe when I say this, but I chose to use Crisco vegetable shortening. One of the only reasons I go this route is because the amount needed is cheaper than any other oil, and it also browns the chicken beautifully and makes it very crunchy! In all honesty, you are really not consuming that much of the oil, but if you want a healthier option, go the route of canola oil!
2. Using 1 pound of chicken, you are going to dunk it into your egg mixture, and then coat it by dredging it through your breading. Finish breading all of the pieces.
3. VERY CAREFULLY (remember, very hot oil in the pan) place your chicken into the oil using a utensil with a long handle.
4. Once the bottoms start to turn golden brown, flip them over and cook the other side until golden brown.
5. Once your chicken is done, place it onto paper towels on a plate to allow the excess oil to run off.
To Prepare the Corn
1. Shuck your corn (take off the leaves and hair).
2. Put a 1/4 cup of sugar into the water you are going to boil the corn in, and bring the water to a boil.
3. Once the water comes to a boil, put your corn in.
4. When your corn turns from light yellow to a dark shade of yellow, it is done!
I like to serve my Captain Crunch Chicken along side some of Emeril's Smooth Honey Mustard...it tastes just sweet and spicy enough to compliment the flavor of the chicken!
Labels:
Captain Crunch,
Cereal,
Chicken,
Cornbread,
Fried,
Honey Mustard
Tuesday, September 7, 2010
Onion Rings
On Saturday when I got a phone call asking if I could use a pound of onions I said yes with out even thinking about what I was going to use them for...Stew? Eh, still too hot out for stew. Definitely won't stay good until Thanksgiving. Not in the mood to make stuffing. AH HA! ONION RINGS!!! Personally, I love onion rings, but hate all of the soggy batter, and I think nothing is worse than biting into an onion ring and the string of onion pulling all the way out of the batter round. So, when I was thinking about this recipe, I realized that I did not want to go the route of a batter! What I enjoyed most about making these onion rings, is that I could control all of the variables: what kind of oil I cooked them in, the types and amount of spices, how thick or thin they are cut, etc. With that being said, don't be afraid or hesitant to change the recipe to suit your taste or wishes! Make them your own, or by all means, enjoy the recipe as is!
Onion Rings
Yields 3 servings
To Prepare the Onions
1. Cut 3 medium onions into rounds and separate the rounds apart from each other.
2. Put the onions in a bowl and cover with milk. Why milk? Milk takes away the harsh onion flavor. If you don't want to take away that flavor, you can soak them in water, or if you are lactose intolerant you can go the route of water, soy milk, Lactaid, or rice milk. Later, the moisture from this soak will help the dry dredge stick to the onions. This is also helpful if you are entertaining and don't want to do all of this work once your company arrives.
3. Refrigerate the onions while they soak for at least 30 minutes.
To Prepare the Dredge
1. Put 6 tablespoons of cornstarch in a bowl. You don't have to use cornstarch to make onion rings, but I prefer it because it makes a crunchier texture once the rings are fried! If you don't want to buy cornstarch, you can use rice flour, regular flour, corn meal, or even pancake batter! Pancake batter will give your onion rings a slightly sweet flavor.
2. Add 1 tablespoon of salt.
3. Add 1 tablespoon of black pepper.
4. Add 1 tablespoon of paprika. (I went heavy on the paprika because I like spicy food, so if you are not a fan of heat, cut this down to at least 1/2 a tablespoon, or you can completely remove it from the recipe, or replace it with another spice, such as garlic powder, curry powder, etc.)
To Make the Onion Rings
1. Pour the onion rings and the fluid they were in through a colander.
2. Shake the onion rings off well to remove excess fluid.
3. Dredge the onion rings through the dry mix. Dredge means to coat them: You can do this by shaking them in a ziplock baggie with the dry mix or by simply mixing them with the dry mix in a bowl or dish.
4. Put approximately 1/2 a cup of oil in a frying pan and start heating over medium heat. I used olive oil to make mine, but you can use vegetable oil, soy oil, peanut oil, etc! You can control how "healthy" your rings are, or work around food allergies you may have. If you are making these for people you do not know well, avoid peanut oil in case of allergies!
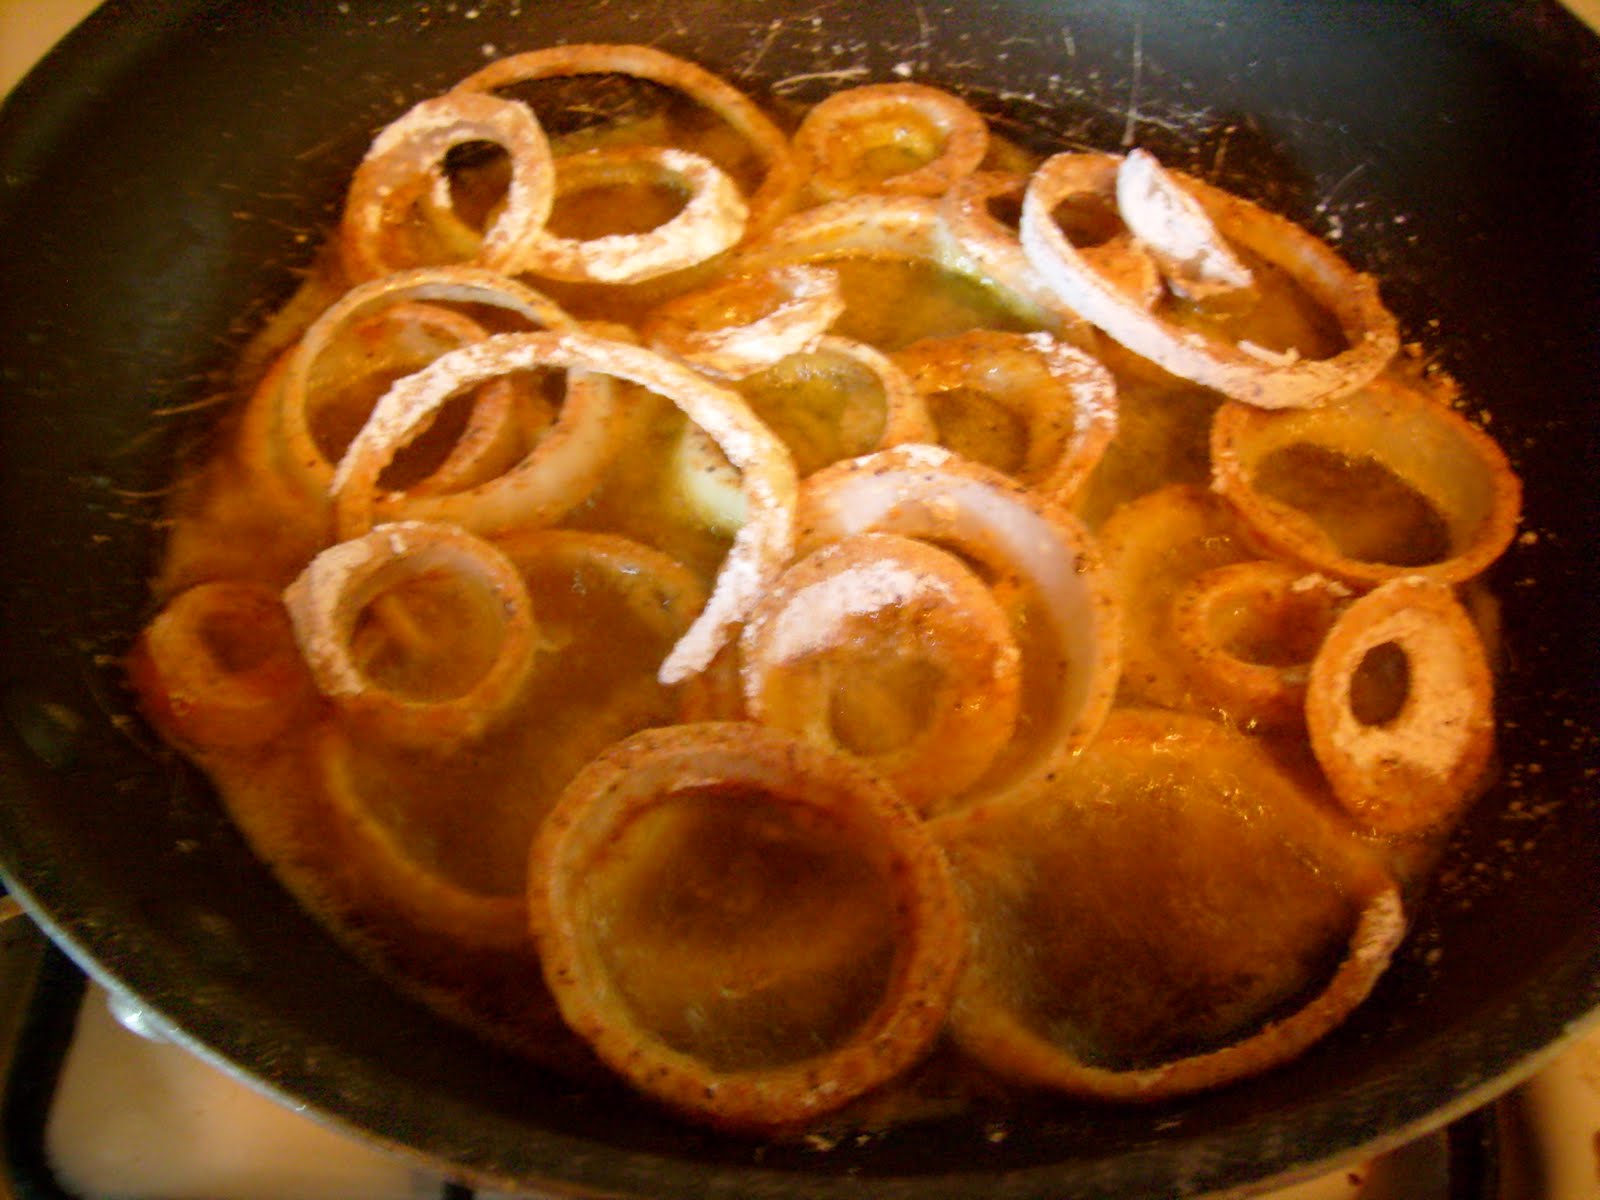
5. Test the oil by tossing in a small ring. If it starts to make the sizzle sound, go ahead and put in 1/3 of the onions. Cook them until they start to brown on one side, and then flip them over so they cook evenly.
6. Once the onions are brown on both sides, place them on top of some paper towels on a plate. The paper towels will absorb excess oil. When you are cooking the rings, keep in mind that because of the oil, they will continue to cook for a little bit once they are out of the pan.
7. Cook the remaining 2/3 of onions in two batches and serve!
Onion Rings
Yields 3 servings
To Prepare the Onions
1. Cut 3 medium onions into rounds and separate the rounds apart from each other.
2. Put the onions in a bowl and cover with milk. Why milk? Milk takes away the harsh onion flavor. If you don't want to take away that flavor, you can soak them in water, or if you are lactose intolerant you can go the route of water, soy milk, Lactaid, or rice milk. Later, the moisture from this soak will help the dry dredge stick to the onions. This is also helpful if you are entertaining and don't want to do all of this work once your company arrives.
Onion rings soaking in milk |
To Prepare the Dredge
1. Put 6 tablespoons of cornstarch in a bowl. You don't have to use cornstarch to make onion rings, but I prefer it because it makes a crunchier texture once the rings are fried! If you don't want to buy cornstarch, you can use rice flour, regular flour, corn meal, or even pancake batter! Pancake batter will give your onion rings a slightly sweet flavor.
2. Add 1 tablespoon of salt.
3. Add 1 tablespoon of black pepper.
4. Add 1 tablespoon of paprika. (I went heavy on the paprika because I like spicy food, so if you are not a fan of heat, cut this down to at least 1/2 a tablespoon, or you can completely remove it from the recipe, or replace it with another spice, such as garlic powder, curry powder, etc.)
To Make the Onion Rings
1. Pour the onion rings and the fluid they were in through a colander.
2. Shake the onion rings off well to remove excess fluid.
3. Dredge the onion rings through the dry mix. Dredge means to coat them: You can do this by shaking them in a ziplock baggie with the dry mix or by simply mixing them with the dry mix in a bowl or dish.
Onion rings, post dredging! |
Heating the oil |
Cooking one side... |
And then the other! |
Done cooking, and ready to eat! |
Subscribe to:
Comments (Atom)