Showing posts with label Eggs. Show all posts

Friday, February 10, 2012

Prankster's Devlied Eggs

Make these, put them on the the buffet, and wait for the fun to ensue!  No matter how many times I take these to family parties, especially at Easter, some one falls for it, 
and those of us that knew have a good laugh!

What You Need

White Chocolate Melts
Yellow Chocolate Melts
Egg Shaped Molds, the closer to the size of a real egg, the better
Orange and Red Sprinkles 

How To Make It

Melt the white chocolate and make half eggs for the base.
Once the half eggs are all made and cool, melt the yellow chocolate partially.  
Leave the yellow chocolate a little "chunky" so it has the natural texture of a deviled egg! 
Dollop the yellow chocolate on the end of the egg, and add a dash of orange and red sprinkles for the paprika look!


Sunday, February 5, 2012

Eggs Benedict Pizza

What You Need
    
 1 bunch asparagus, cleaned and cut into 1/2 to 1 inch pieces


1/2 - 3/4 pound ham, cubed
 

Pizza Dough (I like to use the Kitchen Aid Mixer Crispy Dough Recipe.  The ingredients and instructions are linked.  It takes approximately 1h 15 min to prepare, which includes the proofing time.)
 1 package Hollandaise Sauce, Prepared per the directions

How To Make It

Prepare your pizza dough per the instructions of your favorite recipe, or prepare a pre-made crust.
When you are ready to make the pizza, pre-heat your oven to 350 degrees Fahrenheit.


Toss or press out your crust on a baking sheet or pizza stone.  
Spread the Hollandaise sauce out in an even layer on the crust.


Sprinkle the asparagus across the pizza evenly.


 Time to ham it up!  Spread the ham across the pizza.


Crack eggs arcoss the pizza.  1 cookie sheet of pizza was topped perfectly with 8 eggs.
Bake the pizza at 350 degrees for 10 minutes, and then turn the oven down to 300 degrees.


When the egg whites are firm, but the yolks still run, pull the pizza from the oven.  
Top it with some cracked black pepper and sea salt.


Grab a slice, brew a coffee, break the yolks, enjoy!

Saturday, March 5, 2011

Irish Potato Cheesecake

With St. Patrick's Day just 12 short days away, I thought there was no better way to prepare than an entire SEVEN days of Irish themed cheesecakes!

I am currently referring to myself as the Kitchen Pooka.  For those of you not as versed in Irish lore, pookas are fairies that lurk at night and cause mischief!  I have definitely been known to cause some late night kitchen mischief with cream cheese, sour cream, and a spring mold!

Last night I made the first of the cheesecakes, which was based off of Irish Potato Candies.  Irish Potato Candies are generally made from cream cheese, coconut flakes, confectioner's sugar, and a heaping dose of cinnamon.  I wanted to capture as many of these flavors as I could, and this morning's family taste test was positive proof that it was successful, so enjoy!

Irish Potato Cheesecake
Yields 8 - 10 slices

Ingredients

Filling
16 ounces softened cream cheese
16 ounces sour cream
1 can Creme de Coconut (found in the ethnic food aisle of most grocery stores)
3/4 cup sugar
1 cup coconut flakes (pulverized in a food processor or blender)
3 eggs

Crust
2 cups graham cracker crumbs
1/4 cup cinnamon
4 tbsp melted butter

Topping
1 cup toasted coconut flakes (toasting directions included below)


To Prepare the Cheesecake 
1. Pre-heat the oven to 350 degrees
2. Wrap the outside of a spring form pan with aluminum foil
3. Mix the graham cracker crumbs, cinnamon, and butter together in a bowl with a fork until evenly mixed.
4. Spray the inside of the pan with a non-stick cooking spray.
5. Pour the graham cracker mixture into the pan and press into the sides and bottom evenly, being sure that there are no holes or cracks.
6. Place in the fridge to firm while you prepare the filling.
7. In a new bowl, blend the cream cheese and sour cream together.
8. Open the can of creme de coconut.  The coconut and oil will have naturally separated - keep them separated!  The coconut will actually have settled on the top of the can.  This is the part you want to scoop out of the can (leaving the oil behind) and add to the bowl. 
This white cream is what you will be adding to the cheesecake!
The coconut oil settles to the bottom of the can, which makes this step a lot easier!
9. Blend everything again.
10. Add the pulverized coconut.  This will add just enough texture without being overwhelming.  If you do not want to break it down, you can add a cup of regular coconut flakes!
Running the coconut flakes through the blender will make it a smaller texture, but it will still pack a powerful punch of flavor!
11. Add the sugar.

12. Blend in the three eggs one at a time.
13. Gently pour the filling into the crust, and bake for approximately 1 hour.
Before baking
After baking
While baking, your cheesecake will rise to the height of the pan.  It is ready to come out of the oven when the center is firm and jiggles like solid jello!  Your cheesecake will shrink back down as it cools.  Let it cool for about an hour before refrigerating. 

When you are ready to put the cheesecake in the fridge, gently open the spring on the pan, and carefully lift it up and over, being careful not to spill crumbs on the cheesecake!

Just before serving, put 1 cup of coconut flakes in a frying pan over low heat, and toast them until they start to turn golden brown.  Garnish the whole cheesecake or individual slices with the toasted coconut!

Sunday, January 16, 2011

Chocolate Meringues

Yesterday, while cleaning up the kitchen, I decided that we needed dessert!  Not wanting to have to stand over something that needed constant attention - I really needed to load the dishwasher - I began to think about things that can be "forgotten" about.  I remembered recently pining over my urge to make meringues, and also remembered my reluctance to make them because they required quite a bit of time to make stiff peaks and bake - they were just what I was looking for!  It was not a recipe I had ready at my fingertips, so after some searching I found one that I liked.  I had heard complaints about meringues that do not call for Cream of Tartar.  Most of what I heard was that it was crucial for "binding" and that it would help the meringues last longer after I bake them.

The only problem I had with these was my lack of serving size judgment.  The recipe said that it made 10 meringues, and if I had read further I would have seen that the ones they made were 2 1/2 inches in diameter, while I made mine the size of a half dollar and doubled the recipe...whoops!    Thankfully my family DEVOURED them between last night and today!  The recipe below is my very slight adaptation, but the link to the actual recipe is below, too!

Chocolate Meringues 
Source: www.joyofcooking.com You can find the recipe on their website here!
Yields approximately 10 cookies that are 2 1/2 inches in diameter

Ingredients
3 large egg whites
3/4 cup sugar
1/4 tsp cream of tartar
1 tbsp cocoa powder

To Prepare the Meringues
1. Pre-heat your oven to 200 degrees.
2. In a stand mixer, begin beating the egg whites on a medium speed.
3. When the egg whites begin to foam, add the cream of tartar.
4. Add the sugar slowly while continuing to beat the eggs.
5. When the eggs begin to stiffen, add the cocoa powder.
6. Beat the egg whites until the form stiff peaks.  A stiff peak is when you can dip a spoon into the egg, pull it out, flip it over, and it stays in a peak!
7. Pipe or spoon the meringues onto your cookie sheets (I baked mine on a silicone baking sheet, but parchment would help too!), and bake them for an hour and a half to an hour and forty-five. Mine were much smaller than the recipe called for, and only needed an hour and a quarter in the oven
8. When your meringues are done, turn off the heat of the oven, crack the door, and let them sit for at least an hour.  I left mine out on the oven over night and they were even better today!  The less moisture they are exposed to after baking, the better they are!

Wednesday, December 29, 2010

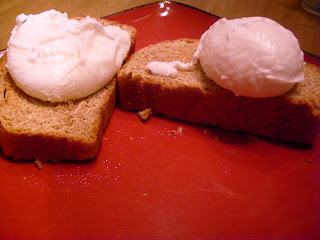
Poached Eggs

I have been putting off this technique for over a year now, and finally hunkered down last night, determined to get them right no matter how many dozen eggs it would take to get it right!  So many books, websites, and cooking shows have made it sound like the most difficult task in the world, which is ironic considering the wonderful simplicity of a poached egg. 

I immediately ran for my book shelf and reached for my copy of Mastering the Art of French Cooking by the incomparable Julia Child! If anyone has the illustrations, easy to follow language, and clear and concise directions, it is her!

With 4 precious eggs left in the carton, I turned to page 116 and the first recipe of the Oeufs Chapter...Poached Eggs!

Below is Julia's recipe.  The items you will need are bolded, the directions are in a normal font, and my notes and comments are italicized!  I will tell you, Julia has gotten me several times with her recipes!  True to my impatient form, I jump right into the cooking and generally do not take the time to read a recipe all of the way through.  If you are going to try this, be sure to READ THE RECIPE THROUGH BEFORE STARTING!!!  I have destroyed many-a-dinner by not doing that! :-X

Julia's Recipe is as follows

To transfer the egg from the shell to the water you may either break it directly into the water as described below, or break it into a saucer, tilt the saucer directly over the water, and slip the egg in.  

You will need a saucepan or a skillet 8 to 10 inches in diameter and 2 1/2 to 3 inches deep, and vinegar (which helps the eggs to hold their shape). 

Pour 2 inches of water into the pan or skillet and add 1 tablespoon of vinegar per quart of water.  Bring to the simmer. 

My brother and I went a few rounds on what constitutes simmering water.  I though when the sides and bottom of the pan start to show bubbles and the water is steaming, it is ready.  My brother, the biochemist, said just before boiling was where I needed the water to be.  Fortunately, I heeded his advice, and he was right!  I guess food and chemistry are more related than I would like them to be!

You will need 4 very fresh eggs, a wooden spoon or spatula, and a skimmer or slotted spoon. 

Break one of the eggs, and, holding it as closely over the water as possible, let it fall in.  Immediately and gently push the white over the yolk with a wooden spoon for 2 to 3 seconds.  Maintain the water at the barest simmer and proceed with the other eggs in the same manner. 

Since I was a first timer, I decided to work with one egg at a time.  Each egg actually requires quite a bit of attention.  I am sure after some practice and serious familiarity with the process I can learn to handle more than one egg at a time!  I did take Julia's advice and used a saucer to get my egg in the pan with ease and less risk of breaking the yolk.  The method worked swimmingly (pun intended)!  

A bowl of cold water. 

After 4 minutes, remove the first egg with the skimmer and test with your finger.  The white should be set, the yolk still soft to the touch.  Place the egg in the cold water; this washes off the vinegar and stops the cooking.  Remove the rest of the eggs as they are done, and poach others in the same water if you are doing more.  (*) The eggs may remain for several hours in cold water, or may be drained and refrigerated.

Ironically, I found this part to be the most difficult!  My problem was getting a slotted spoon under the egg easily to remove it from the pan.  They were lying just close enough to the bottom so that if I used any pressure to get the spoon under the egg, I would run the risk of breaking the yolk.  I got a loose whirl pool going in the water, and then "caught" the egg with the slotted spoon.  This method worked great for me! 

A bowl of hot water containing 1 1/2 tsp of salt per quart and a clean towel.  

To reheat the eggs, trim off any trailing bits of white with a knife.  Place them in hot salted water for about half a minute to heat them through.      Remove one at a time with a slotted spoon.  Holding a folded towel under the spoon, roll the egg back and forth for a second to drain it, and it is ready to serve. 

I skipped this step and set my poached eggs right on my hot wheat toast!  In retrospect, I wish I had toasted some of the tomato basil wheat bread, but nonetheless, it was a delicious dinner!  I made 2 eggs and had 2 successes!


An official member of the clean plate club!

Monday, October 25, 2010

French Toast Casserole

French toast casserole has saved me in a brunch pinch sooooooo many times!  It is filling, easy to make, and can be prepared the night before!  I figured I couldn't go wrong with it for a room of starving high school students after the homecoming dance.  They all really seemed to enjoy it, and we even had a little left the next morning for breakfast!  What I also love about french toast casserole is that you can adapt it.  I have made this with cream cheese cubes and blueberries through it, topped it with fruit sauce, and even have used cinnamon and sweet cheese bread instead of french loaves...remember to have fun with your recipes and make them unique and your own!

French Toast Cassserole 
Yields 10 servings

To Prepare the Casserole
1. Rip 2 large french bread loaves into pieces that are just a little bigger than 1 square inch, and put them in a large bowl.
2. In a separate bowl, scramble 6 eggs. 
3. Add 2 cups of milk, 1/2 a cup of maple syrup, 1/2 a teaspoon of cinnamon, 1/2 a teaspoon of nutmeg, and 1/2 a teaspoon of ginger to the eggs.  Blend it all together very well!
4. Pour the wet mixture over the bread, making sure that all of the bread is coated. 
5. Cover it and put it in the fridge either overnight or a few hours before you want to serve it. 

To Finish the Casserole 
1. Preheat your oven to 350 degrees.
2. Pour the bread mixture into the casserole dish, and spread it out evenly.
3. Melt 8 tablespoons of butter (1 stick).
4. Add 1 cup of brown sugar to the butter and mix it well.
5. Drizzle the brown sugar and butter mixture across the top of the casserole.
6. Bake the casserole for approximately 30 minutes, or until it is firm to the touch and the corners have started to brown just a bit!
Related Posts Plugin for WordPress, Blogger...